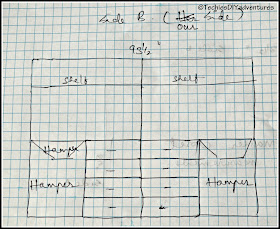
Here is the His side of Master Closet Reveal!!!
We switched the sides as I needed more deeper shelves or the cubby for the sarees. So decided to use the side C (I posted about the layout and plan here) for his side. we went to Ikea on a saturday to Pick up 3 malm dressers. I love going to Ikea, I feel like a kid in a candy store at Ikea. Though the nearest ikea is within an hours drive, I dont get to go there as often as I would love to.along with dressers, I also came home with few dozens of hangers, wooden hangers and the hooks and dozens of others things not related to the closet makeover :)
whilst I was out on a hike next day morning, kids and hubby assembled the three dressers. You get to see only one on his side, other two are on our side :D
Removed the baseboard before painting the walls. We built the built-ins around the dresser. Retained the support that was used for the builder provided shelf. We used it to anchor and support the built-ins.
Here is picture of Before and after removing the shelf
Here is how the closet looked thru various stages. Please note that its a photo heavy post. There is no natural light in this room. I have tried hard to avoid the shadow in photoes, which I failed miserably.
After installing the shelves but before the crown moulding.
One of the key things for us was the Crown moulding. We didn't want the crown moulding to go over the top shelf. That would make sliding the boxes and cabin bags difficult. we would have to lift them over the crown moulding to keep boxes. so we decided to put the top of the crown molding aligned with the top of the shelf. With this, I don't need a chair or ladder and I can slide them easily while still standing on the ground. Hope following picture makes it clear.
Other than the crown molding, I also love the rope moulding that is used to finish off the edges, which you can see in these pictures.
here comes the most favorite part :) this is how his side looks now with the clothes
Before leaving, here is one more before and after.
Thanks for stopping by, have a wonderful weekend.
Sharing at:
skiptomylou homecomingmn linda-coastalcharm boogieboardcottage dwellings-theheartofyourhome twelveoeightblog betweennapsontheporch homestoriesatoz myuncommonsliceofsuburbia ladybug-blessings astrollthrulife cedarhillfarmhouse cozylittlehouse madetobeamomma upcycledtreasures notjustahousewife abowlfulloflemons sowderingabout tipjunkie savvysouthernstyle thehappyhousie thethriftyhome polkadotsonparade thededicatedhouse simplydesigning gingersnapcrafts somedaycrafts mygirlishwhims lifewiththecrustcutoff
thediydreamer creationsbykara allthingswithpurpose frommyfrontporchtoyours revisionarylife staceyembracingchange iputabirdonit lambertslately livingwellspendingless livelaughrowe shabbynest missmustardseed chiconashoestringdecorating tidymom thirtyhandmadedays shabbyartboutique serenitynowblog remodelaholic commonground-do loveoffamilyandhome frenchcountrycottage thepinjunkie craftdictator nancherrow tatertotsandjello todayscreativeblog cheeriosandlattes sixsistersstuff thriftydecorchick too-much-time sixsistersstuff lifeasweknowitbypaula reasonstoskipthehousework serenityyou bacontimewiththehungryhypo www.nancherrow.com
familyhomeandlife
We switched the sides as I needed more deeper shelves or the cubby for the sarees. So decided to use the side C (I posted about the layout and plan here) for his side. we went to Ikea on a saturday to Pick up 3 malm dressers. I love going to Ikea, I feel like a kid in a candy store at Ikea. Though the nearest ikea is within an hours drive, I dont get to go there as often as I would love to.along with dressers, I also came home with few dozens of hangers, wooden hangers and the hooks and dozens of others things not related to the closet makeover :)
whilst I was out on a hike next day morning, kids and hubby assembled the three dressers. You get to see only one on his side, other two are on our side :D
Removed the baseboard before painting the walls. We built the built-ins around the dresser. Retained the support that was used for the builder provided shelf. We used it to anchor and support the built-ins.
Here is picture of Before and after removing the shelf
Here is how the closet looked thru various stages. Please note that its a photo heavy post. There is no natural light in this room. I have tried hard to avoid the shadow in photoes, which I failed miserably.
After installing the shelves but before the crown moulding.
One of the key things for us was the Crown moulding. We didn't want the crown moulding to go over the top shelf. That would make sliding the boxes and cabin bags difficult. we would have to lift them over the crown moulding to keep boxes. so we decided to put the top of the crown molding aligned with the top of the shelf. With this, I don't need a chair or ladder and I can slide them easily while still standing on the ground. Hope following picture makes it clear.
Other than the crown molding, I also love the rope moulding that is used to finish off the edges, which you can see in these pictures.
Before leaving, here is one more before and after.
Thanks for stopping by, have a wonderful weekend.
Sharing at:
skiptomylou homecomingmn linda-coastalcharm boogieboardcottage dwellings-theheartofyourhome twelveoeightblog betweennapsontheporch homestoriesatoz myuncommonsliceofsuburbia ladybug-blessings astrollthrulife cedarhillfarmhouse cozylittlehouse madetobeamomma upcycledtreasures notjustahousewife abowlfulloflemons sowderingabout tipjunkie savvysouthernstyle thehappyhousie thethriftyhome polkadotsonparade thededicatedhouse simplydesigning gingersnapcrafts somedaycrafts mygirlishwhims lifewiththecrustcutoff
thediydreamer creationsbykara allthingswithpurpose frommyfrontporchtoyours revisionarylife staceyembracingchange iputabirdonit lambertslately livingwellspendingless livelaughrowe shabbynest missmustardseed chiconashoestringdecorating tidymom thirtyhandmadedays shabbyartboutique serenitynowblog remodelaholic commonground-do loveoffamilyandhome frenchcountrycottage thepinjunkie craftdictator nancherrow tatertotsandjello todayscreativeblog cheeriosandlattes sixsistersstuff thriftydecorchick too-much-time sixsistersstuff lifeasweknowitbypaula reasonstoskipthehousework serenityyou bacontimewiththehungryhypo www.nancherrow.com
familyhomeandlife


