Pages

Monday, March 30, 2015

Another Craigslist Find - 5 Drawer Vintage dresser

Most of my weekends are pretty hectic, but last Sunday was an exception. I stayed home pretty much as I was little under the weather. After a nice festive lunch, was going thru the craigslist casually when I spotted this vintage beauty. It was love at first sight :)

It's little difficult to get an yes from hubby for craigslist purchases, unless I tell my design and execution plan. He is worried that the garage will again turn into junkyard, lol!! I was able to convince him to come along and bring home this beauty for 35$.


I have been looking for the wide dresser for a long time now. This dresser was perfect match for what I had in mind, but tad bit tall.


Before buying I had noticed that the top portion is little smaller than the bottom three drawers. I was so excited to check if I can remove the top part, I started working on this as soon as we hit home. Top part was held using few screws.


Yay!! I was able to take top part off.


Only problem, there is no top :)


Here is a before and after.


Stay tuned to know more about this dresser's makeover.

Thanks


Thursday, March 26, 2015

DIY Lucite Tray (Trash to treasure)

One man's trash is another's treasure. :)

Do you love chocolates? I don't, but one of my colleague does. She loves chocolates so much that, she sometimes brings them to work too. After all the chocolates were eaten, the empty box caught my eye and I brought it home.

Here is how an empty box of chocolates can be turned into a Tray or Photo Frame.

Materials Needed:
-- Empty box of Ferrero Rocher (48 Count)
-- Gift wrapper/Craft paper/Fabric of your choice
-- Double Sided Tape or Modge Podge
-- Paint and Paint Brush (Optional)


Procedure:

-- Cut the Gift wrapper/Craft paper/Fabric to the inner dimension of the box.
-- Apply the Gift wrapper/Craft paper/Fabric using the modge podge or double sided tape. (I used double sided tape)
-- Apply the acrylic paint along the edge of the box using small craft brush (optional)

You will end up with two trays or two photo frames with one box.


I used one as the photo frame and the other to hold the key, badge etc


Since I had everything I needed for this project, I spent nothing on this :)

I simply love such projects, do u?? Have you converted any trash to treasure? would love to hear from you!!

Thanks for stopping by and have a wonderful week!

Sharing at:
thriftydecorchick


Monday, March 23, 2015

Painted Garage!!

How are you all? Hope your weekend was awesome! Past few weeks have been crazy hectic, though I got few projects completed, haven't managed to pen the details.

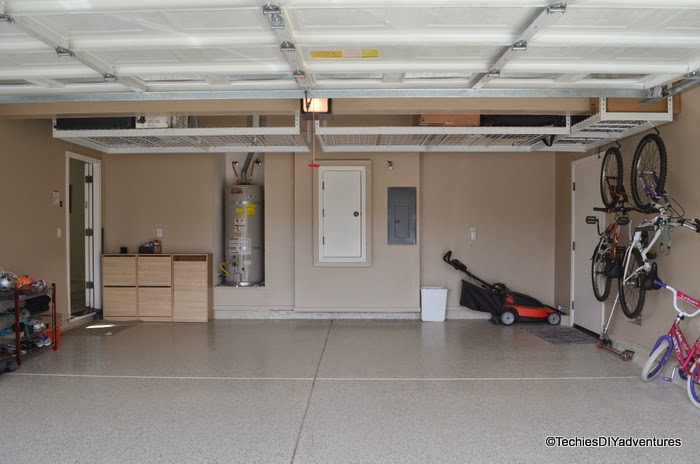
After the floor got epoxy in the garage (here), walls were looking pretty sad. We refreshed the walls with the few coats of semi gloss (KB's Wiseowl custom matched in Behr ) paint. I knew once we put the stuff back in garage, we wont be able to paint. So we handled it soon after the epoxy.

Here is how it looks now.

Garage floor makeover with Epoxy


Here is a before


After epoxy


There used to be days when I dreaded opening the garage, stuff all over and I barely managed to get my car inside.

Recap of how it looked from inside


and here is how it looks now. Overhead Racks (Read about it here) made lot of difference and It holds most of the not so often used stuff.


Before, from the door to the backyard


And after painting


and today


While we were at cleaning and organizing in the garage, we also got two bikes off of the floor and on to racks.


Other two most used bikes stayed on the floor.

I love how big and bright the garage looks after painting the wall and epoxy. I am sure my car also loves the Garage :)

Did u do any thing in the garage? or do you have any plans for the garage, would love to hear from you.

Linking at:
thededicatedhouse savvysouthernstyle   nancherrow   serenitynowblog   remodelaholic                                                                             
                        betweennapsontheporch                             
Take Care