Hi All,
It's week 4 of one room makeover for under 100 dollars.
If you are joining me for the first time, I shared the before and plan in Week1, Progress in Week2, I couldnt post any thing for Week3.
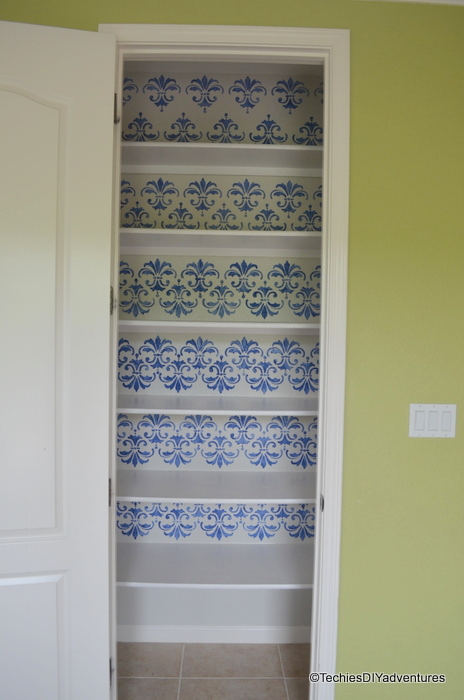
I was able to finish stenciling the Pantry over the weekend and I love how stenciling has transformed this tiny place.
I am not new to stencilling, I have tried all sort of stenciling, One with home made template in laundry, without template in my daughter's closet and using all over stencil in Dining Room. This one was very easy as this didnt involve measuring.
Each shelf varied in height, I just kept stencilling by alligning stencil once on the top and once on the bottom.
I used acrylic paint (left over from this project) and painter's brush.
After painting each, I made sure to wipe the stencil's back so that there is no paint smudging.
I skipped the sides :)
There was some bleeding here and there, I touched it up with base coat.
Stay calm and keep stenciling :)
I spent a whopping 1 dollar on this as I ran out of acrylic paint and had to buy one more.
Total budget spent so far :- 58.40 (Till last week) +1 = $59.40
Thanks for stopping by. I am off to check out the progress made by other amazing bloggers.


The stenciling looks so pretty and makes such an impact!
ReplyDeleteThank you, Amanda
DeleteI don't have the patience for stenciling...nice work!!
ReplyDeletethank u, Brittany
DeleteBlue and white is my favorite combo...so pretty!
ReplyDeleteThank u Cindy! Lately I find myself so drawn to this shade of Blue.
DeleteI LOVE this stencil it almost looks like tile! and blue & white is my jam
ReplyDeleteThank u Morgan
DeleteIt looks amazing! Stenciling is so hard to do. You did a fantastic job!
ReplyDeleteThank u Tracy
DeleteWow, I have the exact same stencil and there's no way I would have the patience to do that! Nice work
ReplyDeleteThank you, Natalie
DeleteLove that stencil, and the blue is so pretty!
ReplyDeleteThank u, Nicki
DeleteThat stencil adds so much to the space! Love it! Beautiful color!
ReplyDeleteThank you, Erin
Delete