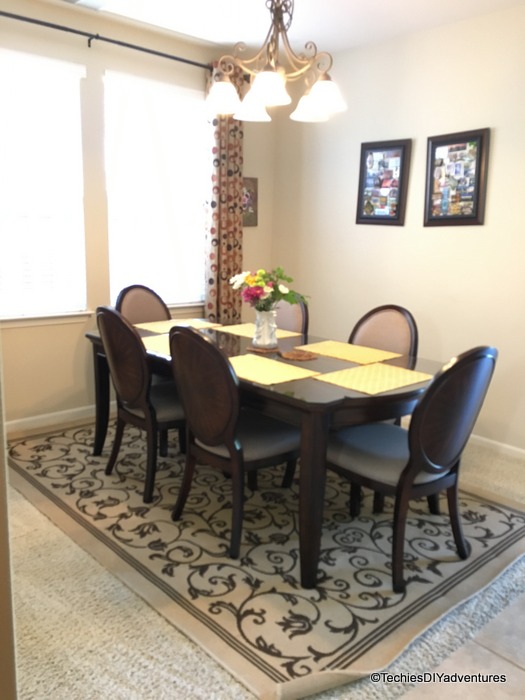
Yay!! We are on the 6th week of One Room Challenge which is the reveal week. I am so glad that I took the plunge and today we have a beautiful dining room. I just cant stop staring at this room.
Thanks to my family, all my readers and dear friends who followed me thru this entire process and encouraged me at every step. Special Thanks to a dear friend Anupama for amazing photographs.
Without further ado, here is the dining room in its fullest glory.
Here is where we were when this beautiful journey started.
View 1
View 2
Now, here is the after.
This post is photoes heavy :)
Subway wall art came out beautiful with one major hiccup right before the installation, my prince charming came to help this damsel in distress :). Now it looks amazing
The fabric which set the mood for the color scheme of the room
Map wall art with a twist. The twist is that it is totally magnetic. This was one of the must haves for the room, dear hubby is super duper happy that he can add many more to his magnetic frames collection.
Runner with tassels
Before leaving here is a beautiful shot of the room.
If you want to catch up what has happened in the earlier weeks, check these out
Week 1 Dining Room Before
Week 2 Design Plans and Inspirations
Week 3 Progress
Week 4 Paint, Stencil and Stencil
Week 5 So much to do so little time
Sources :
Console Table - Craigslist
Console Table Top - DIY
Fabric for the runner and Chair back - Amazon
Map - art.com
Magnetic Map Wall Art - DIY
Runner with the tassles - DIY
Dining Table Runner - DIY
Subway pelmet - DIY
Vinyl letters for Pelmet - Amazon
Paint Color - Glidden's Ripe Apricot color matched in Behr
Napkin Rings - DIY
Stencil - Etsy
Curtains - DIY (Table covers from HomeGoods)
Wine Rack - Cost Plus
Lamp - Costco (borrowed from Guest Bedroom)
Will come back with the tutorials soon. I am off to calling it home to check out how did other amazing bloggers transformed their room.
Sharing at:
thededicatedhouse too-much-time tatertotsandjello betweennapsontheporch
Thanks to my family, all my readers and dear friends who followed me thru this entire process and encouraged me at every step. Special Thanks to a dear friend Anupama for amazing photographs.
Without further ado, here is the dining room in its fullest glory.
Here is where we were when this beautiful journey started.
View 1
View 2
Now, here is the after.
This post is photoes heavy :)
The fabric which set the mood for the color scheme of the room
Map wall art with a twist. The twist is that it is totally magnetic. This was one of the must haves for the room, dear hubby is super duper happy that he can add many more to his magnetic frames collection.
Runner with tassels
Before leaving here is a beautiful shot of the room.
If you want to catch up what has happened in the earlier weeks, check these out
Week 1 Dining Room Before
Week 2 Design Plans and Inspirations
Week 3 Progress
Week 4 Paint, Stencil and Stencil
Week 5 So much to do so little time
Sources :
Console Table - Craigslist
Console Table Top - DIY
Fabric for the runner and Chair back - Amazon
Map - art.com
Magnetic Map Wall Art - DIY
Runner with the tassles - DIY
Dining Table Runner - DIY
Subway pelmet - DIY
Vinyl letters for Pelmet - Amazon
Paint Color - Glidden's Ripe Apricot color matched in Behr
Napkin Rings - DIY
Stencil - Etsy
Curtains - DIY (Table covers from HomeGoods)
Wine Rack - Cost Plus
Lamp - Costco (borrowed from Guest Bedroom)
Will come back with the tutorials soon. I am off to calling it home to check out how did other amazing bloggers transformed their room.
Sharing at:
thededicatedhouse too-much-time tatertotsandjello betweennapsontheporch


Such a big transformation! I love the fabric you picked - so pretty!
ReplyDeleteThank you, Lizzy. Aren't you glad that we can call one room all done ?:) Love what you did with the kids room
DeleteHey Bharati, The dining room turned beautiful. I like the stencil you picked and the dining chair fabric.
ReplyDeleteThank u Reshma. With the textured wall stenciling was real pain in the neck but I am glad its all done now :)
DeleteLove me some wallpaper, girl! xx
ReplyDeletexx, Elise
DeleteWow! I can't believe that beautiful wall treatment you painted! Just fabulous! This space makes me happy! Congrats and CHEERS to us for another room done!
ReplyDeleteThank you Vel. Yes, congrats and cheers to us, we can call one room done :) Loved your star war themed kids room
DeleteYour room looks very inviting and warm. Love the dinning chair fabric!
ReplyDeleteThank you Emu, That fabric is my favorite too
DeleteLoved the subtle touches of orange and pop of green. Great transformation Bharati :)
ReplyDeleteThank you, Pinkz :) thank you for stopping by
DeleteLoved the make over bharathi! The color is awesome����now you need to have a party there so we can drool some more��
ReplyDeleteThank u Naina.sure, lets plan a ladies night :)
DeleteLove the color scheme. Great job!
ReplyDeleteGreat room! I love that magnetic map; looking forward to the tutorial!
ReplyDeleteWhat a transformation! It looks so happy with all the different patterns and colours! Thank you for sharing at Sweet Inspiration this weekend!
ReplyDeletegörüntülüshow
ReplyDeleteücretli show
CVLDS
https://titandijital.com.tr/
ReplyDeletebalıkesir parça eşya taşıma
eskişehir parça eşya taşıma
ardahan parça eşya taşıma
muş parça eşya taşıma
2EHTD