Thursday, December 26, 2013

Painted wallpaper in Laundry Room

Hope you all had a wonderful Christmas with family and friends.

Doing laundry is the most boring work of all the things for me, but I didn't want the laundry room to be the most boring room though. Wanted to make this place visually interesting, at least.  This room is the most visible room from our staircase landing. I wanted one of wall to popup.

On one of my trips to Home depot I found a gallon of oops paint of mocha color for 5$. Since the room is well lighted, dark color doesn't make the room look smaller. The room looked much better after painting but I wasn't satisfied with the look.

I love the sophisticated look wallpaper gives, however wasn't ready for the pain of hanging it or removing it if I am fed up with wallpaper. I came across a blog post from JonesDesignCompany where she used a template to create the wallpaper look without the wall paper pain ;) and decided to give it a try.

This is how it looks after stenciling :)

Hand Painted Wall Paper in Laundry room, Template created using cereal box

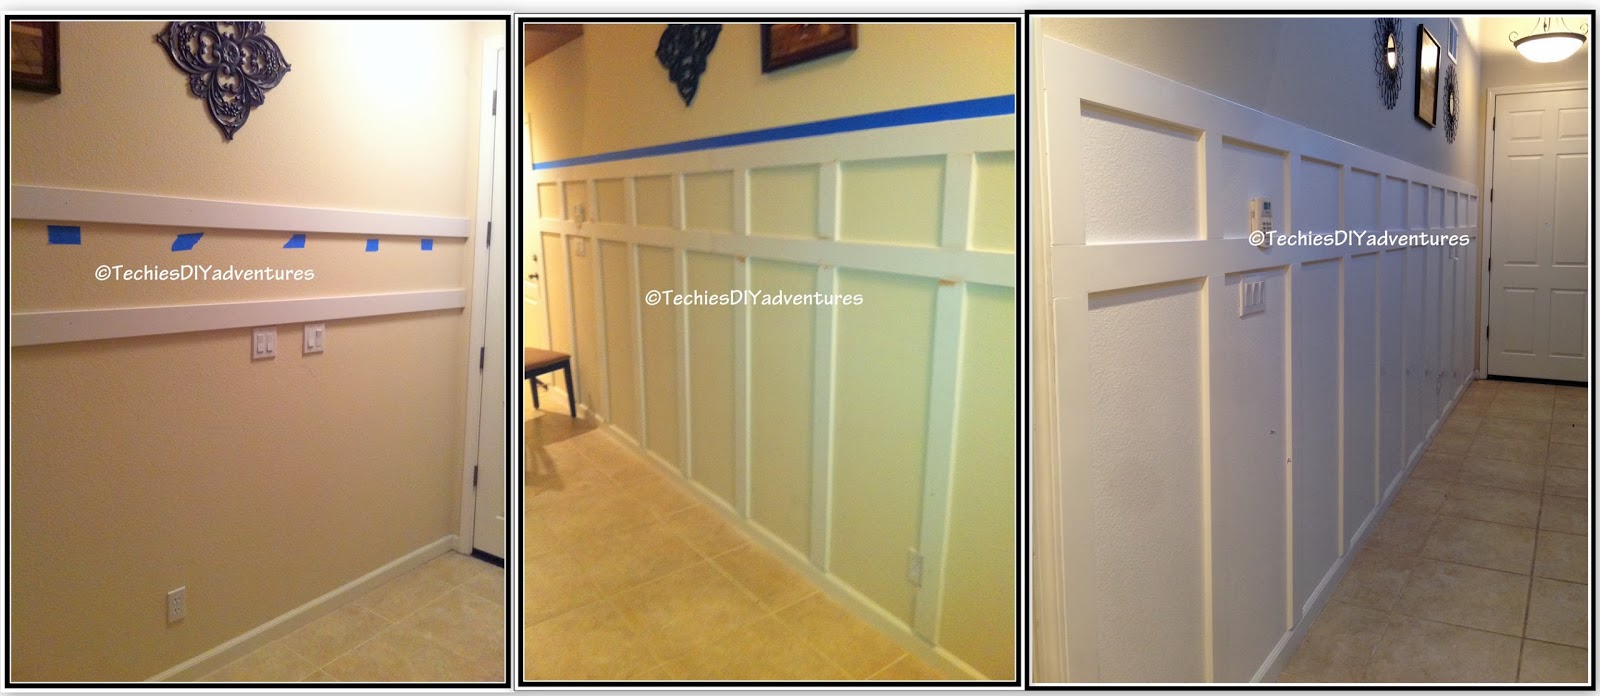
Here is a before and after.


After downloading the template provided by JonesDesignCompany, I modified it a little to match room dimensions. Traced the template on the cereal box. After cutting the stencil, here is how it looked.


Once the stencil was ready, I started tracing from top left corner, and went over on the traced lines with folk art acrylic color with the small brush. This is how it looked during the process after few rows were completed.


At few places I did mess up however it was nothing that I couldn't fix.

One more after :)

Handclose up of Painted Wall Paper in Laundry room, template created using cereal box

Doesn't it look awesome?? :)

Thanks for visiting and Happy Holidays dear friends!!

linking it to following parties
adornedfromabove  cupcakesandcrinoline    timewashed  impartinggrace  cityofcreativedreams     lollyjane                                
saynotsweetanne   dwellings-theheartofyourhome   thecharmofhome   cupcakesandcrinoline  elizabethandco     thestylesisters    ourhousenowahome                                                                                   

My Uncommon Slice of Suburbia
Savvy Southern Style

Tuesday, December 17, 2013

Board and Batten treatment for entryway wall

What do u do with two weeks shutdown at work and two sick kids?? Pick up wood, hammer and nails, decorate the entryway wall with board and batten molding :)

This was the project we tackled during 2011 Christmas holidays. I normally have two weeks shutdown for Christmas at work. We couldn't go anywhere as both the kids were just recovering from bronchitis.  

I love all forms of molding on the wall and have tried few different types of the wall treatments at home (will post the details soon). Our entryway has high ceiling. To break up bare walls, we decided to use board and batten wall treatment.We skipped the board part as the wall is pretty smooth and used just the battens. 

Here is the picture of before and after.


After my measurements and the design plan, my husband double checked the measurements. Measure many times to ensure that you have correct measurement before the wood is cut. We got the wood cut to specifications at the Home Depot. Did u know home depot cuts the wood per your requirement for a minimal charge? well, you know it now.:)

We decided not to remove the baseboard and angle the lower end of the batten to avoid the batten sticking out where it meets the baseboard. Though tried hard to avoid cutting the battens to accommodate switches/plug points (by adjusting the number of panels), still we ended up cutting at couple of places

This is how it looked during the process.

Here is how it looked after.


One more After.


From Formal Dining


Here is how we did it.
  1. Glue the panels to the wall using the construction adhesive.
  2. We don’t have pneumatic nailer and not even planning to buy one. So hammer the brad nails and build muscle during the process (alas, only on right arm though).
  3. Once all the panels were nailed, went over again with the nailset on the nails to ensure that the nails are fully sunken in the panel.
  4. Spackle the nail holes. After the spackle is dried, sand it properly.
  5. Caulk all the gaps using a caulk gun. 
  6. Painted everything with the coffee white paint
Love how it looks, better than what I had envisioned :) 

Linking at http://thetablescaper.blogspot.com/2014/01/seasonal-sundays-187outdoor-winter-decor.html
http://betweennapsontheporch.net/fireplace-and-mantel-makeover  
http://www.skiptomylou.org/2014/01/27/made-by-you-monday-188/   somedaycrafts    katherinescorner
http://diyhshp.blogspot.com/2014/01/more-merrier-monday_26.html 
http://thededicatedhouse.blogspot.com/2014/01/make-it-pretty-monday-week-86.html 
http://boogieboardcottage.blogspot.com/2014/01/welcome-to-160th-masterpiece-monday.html 
http://threemangoseeds.blogspot.com/2014/01/its-part-time-12614.html 
http://www.homestoriesatoz.com/tutorials/tutorials-tips-link-party-143.html cherishedbliss
http://www.tipjunkie.com/post/handmade-projects-add-yours-1-27/ 
http://www.savvysouthernstyle.net/2014/01/wow-us-wednesdays-154.html 
http://www.frommyfrontporchtoyours.com/2014/01/treasure-hunt-thursday-141-highlights.html   frenchcountrycottage ivyandelephants                  
http://www.serenitynowblog.com/2014/01/weekend-bloggy-reading-link-up_31.html akadesign
cupcakesandcrinoline.com
jannolson  thissillygirlslife   diybydesign akadesign  remodelaholic  cherishedbliss  adelightsomelife   carriethishome  jembellish  jenniferrizzo   thebrambleberrycottage  thecottagemarket arttisbeauty                                           

Thursday, December 12, 2013

Chevron pattern painted wall

Blog world is full of inspirations for the chevron wall. I love this pattern which has gotten very popular in the recent years. Though i was keen on using this pattern on one of the walls, I wasnt sure about doing the same on a huge wall. So picked the hallway near master bedroom which is a smaller wall. We had already painted this with Kelly Moore's Navajo White.

This turned out to be a quick sunday afternoon makeover which was finished in 3-4 hours. This is how it looks after.


Deriving the numbers for the pattern and taping took longer. Once painters tape was taped, painting was pretty quick. Here is how I arrived at the width and length of the pattern

Divide the width of the wall by number of zigzags you want. 75" / 3 ( I wanted three) = 25"
Divide the height of the wall by number of zigzags you want. 105"/15 (I wasnt looking for bigger pattern ) = 7"


Once you have the numbers start taping in the zigzag pattern. Run you finger thru the edge of the tape to ensure there is no gap. Also to ensure that paint doesn't bleed thru, paint with the base color paint on the edge of the painters tape. 

Painted every other line using the different paint. It is a custom color matched using behr paint from Homedepot. Remove the blue tape when the paint is not completely dried. Here is another picture during painting and after. I couldn't find the one after the base paint.


Stand back and enjoy the chevron painted wall. I love how it turned out with crisp lines.

Here is the full view of the wall


Hope you like it!! Thanks for stopping by!

Linking at http://www.homestoriesatoz.com/tutorials/tutorials-tips-link-party-146.html
aprettylifeinthesuburbs,
diyshowoff
http://www.tipjunkie.com/post/handmade-projects-add-yours-218/
http://betweennapsontheporch.net/battery-organization-and-storage/ http://confessionsofaplateaddict.blogspot.com/2014/02/please-join-me-for-scoop-106.html
http://boogieboardcottage.blogspot.com/2014/02/welcome-to-163rd-masterpiece-monday.html 
http://www.notjustahousewife.net/2014/02/show-me-what-ya-got-153.html 
http://myuncommonsliceofsuburbia.com/tuesdays-treasures-60/ http://www.blackberryvine.blogspot.com/2014/02/tuesday-to-do-149.html
http://www.astrollthrulife.net/2014/02/204th-inspire-me-tuesday.html 733blog
http://www.madetobeamomma.com/2014/02/hit-best-shot-link-party-7.html http://www.mabeyshemadeit.com/tell-tuesday-11-pattern-giveaway/
http://thehappyhousie.com/work-wednesday-features-250-paypal-cash-giveaway/ http://polkadotsonparade.blogspot.com/2014/02/wow-me-wednesday-133.html
http://thededicatedhouse.blogspot.com/2014/02/before-and-after-wednesday-week-6.html http://theturquoisehome.com/2014/02/work-it-wednesday-no-35/
http://www.savvysouthernstyle.net/2014/02/wow-us-wednesdays-157.html http://www.jenniferrizzo.com/2014/02/fabulously-creative-friday-11.html
http://chiconashoestringdecorating.blogspot.com  http://www.nancherrow.com/2014/02/welcome-fridays-unfolded-98.html
http://www.serenitynowblog.com/2014/02/weekend-bloggy-reading-link-up_21.html
http://piecedpastimes.blogspot.com/2014/02/saturday-sparks-link-party-51.html  
http://www.lovelyetc.com/2014/02/bold-challenge-link-party/  jannolson
http://bec4-beyondthepicketfence.blogspot.com/2014/03/under-100-link-party.html arttisbeauty
bystephanielynn cherishedbliss

Thursday, December 5, 2013

Son's Bedroom Closet Makeover


This one is a long post. 

My Son's room is the smallest bedroom of all the 4 bed rooms, so his closet is also small comparatively. We had kept two bookshelves in the closet as a temporary arrangement (which lasted for good two years)  along with the builder provided one long shelf with the rod. His closet was bursting with his clothes, toys and books. Like any tween, he started using ‘No space’ as the excuse for an un-kept room. 


we started looking at the various closet making companies, didn’t want to try Ikea as closet needed to be really strong to endure the teenager’s (then 11 yr olds) (mis) handling. Quotes we got were much higher than we expected, so we decided to take matters in our own hands (literally). 

Here is how it looked before ( couldn't find the one original ) and after :)
My son’s (ok, ok….my) requirements :) for the closets were
  • Lots of Hanger Space
  • Lots of shelves to store the out grown clothes (to be donated) and board games
  • Easily accessible books
  • Drawers to hide all his paperwork 
  • Drawer for the dirty laundry (bottom drawer which is big has removable laundry bag)

While Hubby dear worked on the specifications for the closet to make use of every inch, I started to take down the single shelf provided by the builder (this was reused in the same closet, you will find the details below) and the baseboard in the closet. 

Here is how it looked during the process. I like the white background so decided to not to paint ;) lol...read it as..I was soo excited with closet building that I even forgot to paint behind :) ( I know… I know… I am little crazy, little weirdo)  


With angled top shelf (middle one in the above pic), we could increase the height of the closet and also put the big items on the top shelf easily. The builder provided shelf  was reused as the top shelf. Third one in above picture is before we built the drawers. 

I wanted to buy the dresser and put it in that space but he wanted to build it. This was little tedious task as the bottom of the drawer should be strong enough to hold the weight of things inside.  Also requires lots of patience.

Here is another After picture.


housewivesofriverton   dwellings-theheartofyourhome raegunramblings    ivyandelephants      adelightsomelife    nancherrow    madincrafts  cupcakesandcrinoline 
 diybydesign   somedaycrafts   jenniferrizzo   arttisbeauty  mamasblogcentral  dejavuedesigns.com    sowderingabout    mamasblogcentral   anastasiavintagehome /bacontimewiththehungryhypo         overdueorganizing                                               
My Uncommon Slice of Suburbia
Savvy Southern Style
Code line 7 9 is for loading jQuery library. Remove this line if you’ve already loaded it somewhere else in your blog. Hint: If your blog has an image slider, carousel or something with fading effect running, chances are it is powered by jQuery. If this widget doesn’t work, the first thing you want to do is comment out or remove this line. To use your own button, replace the URL in line 3 with the direct link URL to the image. Make sure to keep the quotes. To reposition the button, replace