Showing posts with label DIY. Show all posts

Thursday, December 3, 2015

DIY Origami Christmas Tree

Hey All!! How was your Thanks giving break? We had a very relaxing break as we didn't do much other than socializing. During the break we (me and mini me) tried to make few Ornaments and Christmas trees.

Today is the first tutorial in the series of 5 DIY Christmas Trees we crafted during the break.

My little one has new found interest in Origami, this tree was an attempt to make Origami with her :) All that you need for this project is a square paper and scissor.

I will try my best to explain, hopefully photo helps where words fail.

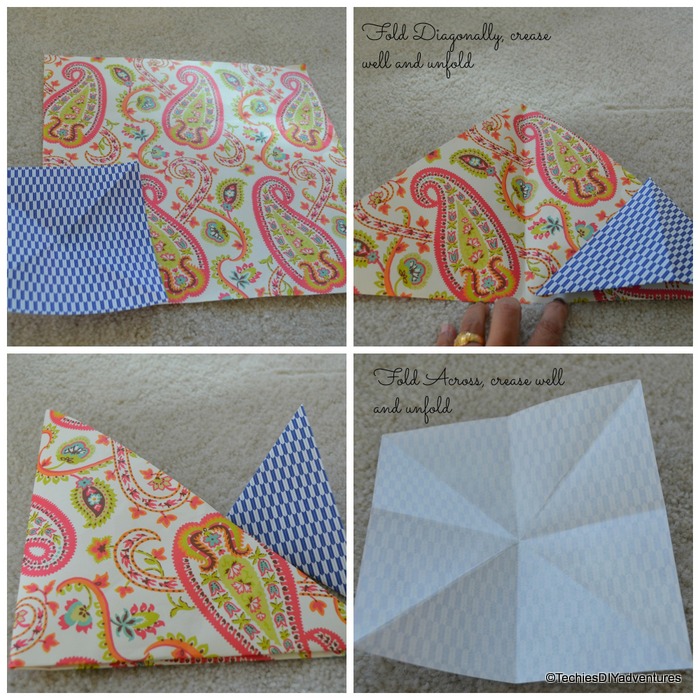
Step 1 :- Fold the paper diagonally (corner to corner on both side), crease well and unfold.
Fold the paper across, crease well and unfold.


Step 2 :- Using creases push two corners inside to make a flat square base.


Step 3: Fold the uppermost outer flaps in, to meet the center line and crease well. Make sure open end is at the bottom. Repeat the same on the other side.


Step 4: This is a little tricky Step.  Open the Flaps, Push the Corner inside so that each Flap ends up into two flaps.


Step 5:  Chop off the bottom Triangle to make it a proper triangle.


Step 6 : using scissor, make slits on either sides.


Step 7 : Fold The individual Cuts in to small Triangles on all 8 sides and you have beautiful Origami Tree ready.


One more group picture :)


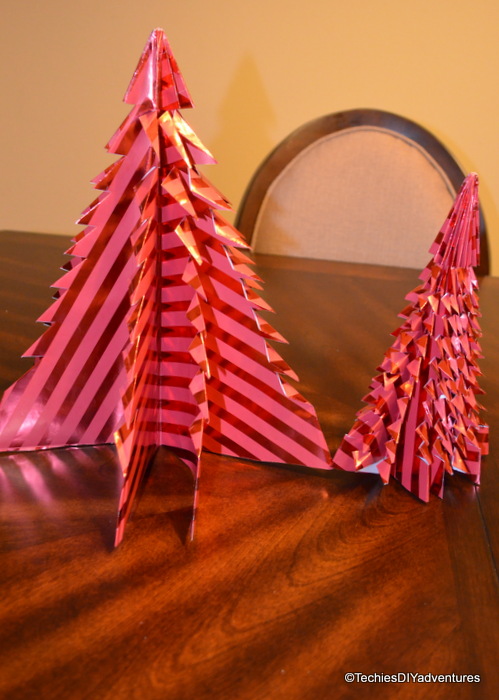
I couldn't stop at three :) I wanted a little tall one, so tried one with wrapping paper. Loved the red tree but it was too wide.

so, instead of stopping at the last step as mentioned above, I repeated the step 7 for every side. That gives you 16 arms instead of 8.


And one more group Pic :)


Sharing at : thriftydecorchick betweennapsontheporch

Stay tuned for the next tree!!

Thanks for stopping by.


Thursday, March 26, 2015

DIY Lucite Tray (Trash to treasure)

One man's trash is another's treasure. :)

Do you love chocolates? I don't, but one of my colleague does. She loves chocolates so much that, she sometimes brings them to work too. After all the chocolates were eaten, the empty box caught my eye and I brought it home.

Here is how an empty box of chocolates can be turned into a Tray or Photo Frame.

Materials Needed:
-- Empty box of Ferrero Rocher (48 Count)
-- Gift wrapper/Craft paper/Fabric of your choice
-- Double Sided Tape or Modge Podge
-- Paint and Paint Brush (Optional)


Procedure:

-- Cut the Gift wrapper/Craft paper/Fabric to the inner dimension of the box.
-- Apply the Gift wrapper/Craft paper/Fabric using the modge podge or double sided tape. (I used double sided tape)
-- Apply the acrylic paint along the edge of the box using small craft brush (optional)

You will end up with two trays or two photo frames with one box.


I used one as the photo frame and the other to hold the key, badge etc


Since I had everything I needed for this project, I spent nothing on this :)

I simply love such projects, do u?? Have you converted any trash to treasure? would love to hear from you!!

Thanks for stopping by and have a wonderful week!

Sharing at:
thriftydecorchick


Friday, September 5, 2014

Magnetic Picture Frame

Sorry for disappearing from blog land!! After coming back from vacation, got completely busy with paper mache elephant project (will post the details soon).

We both love traveling and exploring new places. Hubby loves to collect the fridge magnets as souvenirs from every place we visit. It was fine while we were in rental apartment. Once we moved to this home, we couldn't put these on the stainless steel refrigerator. Couple of ceramic ones broke when slipped from the fridge, so I packed them nicely in a box and put them away. He was sad that his collection was biting the dust in the box. I surprised him with this quick and easy project.


I did this project long time back but sharing it on the blog today :)

All that you need for this project is Galvanized Metal Sheet (I got 12" by 18" sheet from Lowes), Fabric, Picture frame and duct tape. One good idea is to carry the magnet with you while shopping for the galvanized metal sheet. I picked up the frames (without glass and back cover) from Michael's with 40% off coupon.


Please be careful while handling the metal sheet, edges are pretty sharp. I covered the edges with the duct tape to save my fingers.

Wrap the fabric on the metal sheet, just like gift wraping. I secured the fabric ends to the metal sheet using duct tape.


 This is how it looked from the front. I selected a neutral color fabric as the magnets are colorful.


I was planning to hang these without the frame (you can see the two holes I drilled for looping the ribbon on the right side).  After placing the magnets, realized it was heavy, so, used the frame. Since I was using no back cover and no glass frame, after placing the metal sheet there was a gap at the back. Foam-core board (lying around after some school project) was cut to size and used to fill in the gap. Yes, you guessed it right ;) , I secured with duct tape.


Voila!!! Magnetic Picture frame is ready.


Now time to adorn the frame with magnets :) 


Since we had many magnets, I ended up making two of these. Looking at the way collection is growing, I might have to make one more soon.


I love the projects which are quick and deliver satisfactory results. This is one of those projects which you can finish in less than 30 mins, excluding the shopping part :)
 What do u collect as keepsakes from your travel??

Sharing at :  betweennapsontheporch skiptomylou   homecomingmn  boogieboardcottage  creativelylivingblog  modvintagelife  housebyhoff   titicrafty confessionsofaplateaddict twelveoeightblog     huckleberrylove   thehappyhousie thethriftyhome  polkadotsonparade  thededicatedhouse   remodelaholic                          

Thank you for stopping by


Thursday, May 15, 2014

Painted candle for Teacher Appreciation


I was planning to reveal our master closet this week, but got very busy over the weekend. So here I am with another quick project. This is one of those projects which can be finished in a jiffy if you have the supplies :)


This week is teacher's appreciation week in my daughter's school. Apart from all other stuff my daughter took, I wanted to give them something handmade to show my appreciation for all the hard work they have put in this year..

I got to know that her teacher loves candles, so decided to hand paint on the candle. I didnt have to buy any thing as I had both candle and paint (Folk art outdoor dimensional paint, left over from this project ) at home. I just drew chevron pattern on the bottom and filled the space in between with more triangles. :)


I love how easy it was to personalize candle with little paint. I hope the teacher likes it too.


Thanks for stopping by

sharing at:
betweennapsontheporchsewcando homestoriesatoz   creatingreallyawesomefreethings skiptomylou  boogieboardcottage  frommyfrontporchtoyours   revisionarylife lambertslately staceyembracingchange   livingwellspendingless  upcycledtreasures  skiptomylou     thededicatedhouse   linda-coastalcharm  boogieboardcottage   modvintagelife   confessionsofaplateaddict   titicrafty huckleberrylove  jembellish  nap-timecreations ladybug-blessings    astrollthrulife         cozylittlehouse    sugarbeecrafts  mabeyshemadeit  abowlfulloflemons  lilmrstori madetobeamomma   thehappyhousie    thethriftyhome   savvysouthernstyle     simplydesigning    gingersnapcrafts  somedaycrafts lifewiththecrustcutoff  mygirlishwhims   bec4-beyondthepicketfence  cherishedbliss livelaughrowe   lambertslately   revisionarylife  frommyfrontporchtoyours   thededicatedhouse   thecottagemarket  frenchcountrycottage   remodelaholic  diyshowoff  alittleclaireification   hmamasblogcentral  piecedpastimes     reasonstoskipthehousework    bedifferentactnormal  flamingotoes  niftythriftythings thegirlcreative       delineateyourdwelling                              


Tuesday, May 6, 2014

walk in master closet makeover Part 3 - Her Side Reveal

Here comes the best part of our closet makeover, her side :)

We decided to build the closet mainly because I wanted a cabinet with glass doors where I can hang all my sarees (Indian Ethnic dress). So depth of the saree cabinet is more than that of shelves on the either side.

I learnt from my mistake of not painting before building the built-in (from my sons closet makeover) and painted the wall with custom color Gray after ripping off the builder provided shelf and the baseboard.

without further ado, here comes my side of closet in its full glory :)


view from the door.


Close up of top shelves


 and bottom shelves


And few photoes during the process, Sorry for the blurry iphone pictures.


Doors waiting to be attached to the cabinet


we built the doors ourselves and used plexiglass (acrylic sheets) instead of the glass inserts. we tried cutting plexiglass ourselves using the plexiglass cutter (and failed miserably). After few failed attempts and many broken pieces, we just dropped the idea of cutting them at home and got it cut at the shop.


All my sarees are out of the suitcases now. I love, love how I can see all of them, Just like the way I grew up seeing mom's sarees all hanged neatly.

I normally try to use same set of hangers in the given hanging space. Using same type of hangers thru-out, kind of makes the wardrobe look organized. I also hang the tops/shirts sorted by color. It also makes picking up a shirt much easier in the busy mornings.

You can read all about the plan, layout and his side reveal.

Thank you for swinging by and have a great week ahead!!

Sharing at : remodelaholic


Saturday, April 19, 2014

Master Closet Make over - His Side Reveal (Part 2)

Here is the His side of Master Closet Reveal!!!

We switched the sides as I needed more deeper shelves or the cubby for the sarees. So decided to use the side C (I posted about the layout and plan here) for his side. we went to Ikea on a saturday to Pick up 3 malm dressers. I love going to Ikea, I feel like a kid in a candy store at Ikea. Though the nearest ikea is within an hours drive, I dont get to go there as often as I would love to.along with dressers, I also came home with few dozens of hangers, wooden hangers and the hooks and dozens of others things not related to the closet makeover :)

whilst I was out on a hike next day morning, kids and hubby assembled the three dressers. You get to see only one on his side, other two are on our side :D

Removed the baseboard before painting the walls. We built the built-ins around the dresser. Retained the support that was used for the builder provided shelf. We used it to anchor and support the built-ins.

Here is picture of Before and after removing the shelf


Here is how the closet looked thru various stages. Please note that its a photo heavy post. There is no natural light in this room. I have tried hard to avoid the shadow in photoes, which I failed miserably.

After installing the shelves but before the crown moulding.


One of the key things for us was the Crown moulding. We didn't want the crown moulding to go over the top shelf. That would make sliding the boxes and cabin bags difficult. we would have to lift them over the crown moulding to keep boxes. so we decided to put the top of the crown molding aligned with the top of the shelf. With this, I don't need a chair or ladder and I can slide them easily while still standing on the ground. Hope following picture makes it clear.


Other than the crown molding, I also love the rope moulding that is used to finish off the edges, which you can see in these pictures.


 here comes the most favorite part :) this is how his side looks now with the clothes


Before leaving, here is one more before and after.


Thanks for stopping by, have a wonderful weekend.

Sharing at:
skiptomylou homecomingmn linda-coastalcharm  boogieboardcottage dwellings-theheartofyourhome  twelveoeightblog  betweennapsontheporch   homestoriesatoz myuncommonsliceofsuburbia  ladybug-blessings  astrollthrulife  cedarhillfarmhouse  cozylittlehouse  madetobeamomma  upcycledtreasures         notjustahousewife   abowlfulloflemons  sowderingabout    tipjunkie  savvysouthernstyle   thehappyhousie   thethriftyhome polkadotsonparade  thededicatedhouse  simplydesigning  gingersnapcrafts   somedaycrafts  mygirlishwhims  lifewiththecrustcutoff 
thediydreamer   creationsbykara allthingswithpurpose  frommyfrontporchtoyours  revisionarylife   staceyembracingchange   iputabirdonit  lambertslately                 livingwellspendingless  livelaughrowe shabbynest  missmustardseed   chiconashoestringdecorating  tidymom   thirtyhandmadedays  shabbyartboutique                   serenitynowblog remodelaholic  commonground-do  loveoffamilyandhome  frenchcountrycottage  thepinjunkie craftdictator  nancherrow  tatertotsandjello             todayscreativeblog  cheeriosandlattes sixsistersstuff     thriftydecorchick  too-much-time sixsistersstuff  lifeasweknowitbypaula   reasonstoskipthehousework          serenityyou   bacontimewiththehungryhypo    www.nancherrow.com                                                                                                                                                                                                                                                              
familyhomeandlife

Code line 7 9 is for loading jQuery library. Remove this line if you’ve already loaded it somewhere else in your blog. Hint: If your blog has an image slider, carousel or something with fading effect running, chances are it is powered by jQuery. If this widget doesn’t work, the first thing you want to do is comment out or remove this line. To use your own button, replace the URL in line 3 with the direct link URL to the image. Make sure to keep the quotes. To reposition the button, replace