Monday, October 31, 2016

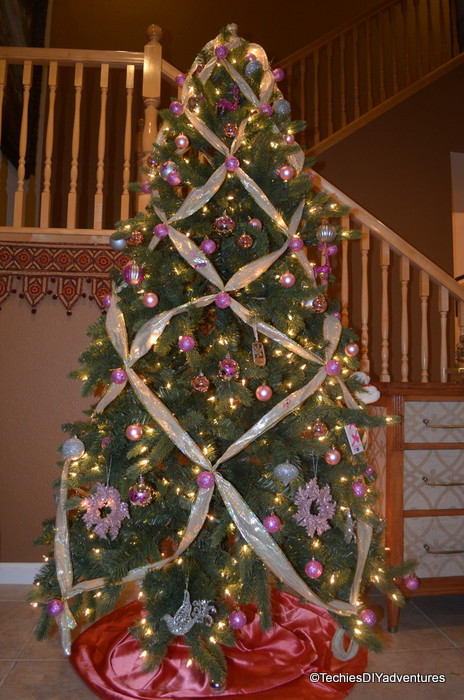
Criss Cross ribbon draped Christmas tree

Hi Dearies, how are you all? Did u set up the tree yet? If you are looking for an idea to decorate the tree with the ribbon, here is one. Here is tutorial for criss cross ribbon wrapped tree.

- Measure your tree and the length of the ribbon should be 1.5 times the length of the tree.
- Take 8 such ribbon pieces and tie the edges with a safety pin.
- Spread them around the tree in 8 directions
- Start tieing two ribbons together with a string, for the first row you will have 4 joins.
- For the next round, take one each from the joined ribbons and tie them. It should look some thing like this

criss cross ribbon christmas tree

- Take it all the way till the end. If you are left with ribbon, you can cut it or, tie a bow at the end

criss cross ribbon christmas tree

- I went over these joints with glass ornaments

criss cross ribbon christmas tree

- Deck up the tree with your favorite ornaments.

criss cross ribbon  christmas tree


criss cross ribbon christmas tree

Cant wait to share with you all few more handmade ornaments for the tree.

Thanks,

Breast Cancer Awareness Christmas Tree with Tree Classics

Hi Dearies,

This week was pretty special as we celebrated festival of lights (Deepawali), all set to celebrate Halloween and spent much of the weekend in setting up the Christmas Tree. Setting up Christmas Tree in October? Yup, the tree is setup for the support of breast cancer awareness month.

I was one of the bloggers who partnered with Tree Classics in spreading the awareness! This post is in honor of Supporting the Fighters, Admiring the Survivors, Honoring the Taken and NEVER EVER GIVING UP HOPE!!

Tree Classics trees are very realistic with life like branches. I selected Classic Fraser Fir (Full) - 6.5 Clear Lights and it was delivered promptly. Tree parts were neatly wrapped in the bubble wrap with additional packaging to make sure the box doesn't get squished. Setting up the tree was very quick.

Pink and Silver Christmas Tree


This cause is pretty close to heart, this beast has hit close to base and took my Aunt away from us at an early age! I know few fighters who won against this monster. I guess any woman would be dreaded to her those three words "You have cancer". Early detention is the greatest prevention when it comes to breast cancer. All adult women are encouraged to do self examination at least once a month. Here is how to on breast self exam

The tree is with decked up in Pink and Silver with the golden ribbon draped around in crisscross fashion.

Criss Cross Ribbon draped Christmas tree

I decided to go without the tree topper.

Pink and Silver Christmas Tree

I and my little one had fun customizing the silver ornaments with pink glitter.


 A dear friend gave me these pins, aren't they adorable on the ribbon?


Breasts cancer awareness ornament

Breasts cancer awareness ornament

Pink and Silver Ornaments

Pink ribbon ornaments

The tree looks stunning even with the lights off.


If you are looking to buy some pre-lit trees, here is a great collection http://www.treeclassics.com/Pre-Lit-Lighted-Artificial-Christmas-Trees-s/230.htm


Disclaimer : I was provided with the tree from tree classics and a gift card. All the opinions and contents are my own.

Thanks,


Wednesday, September 28, 2016

DIY Napkin Rings

Hi Dearies, how are u all? Sorry for missing in action for the past couple of months. Entire summer was little crazy with a high school junior at home, me practicing for half marathon and a new addition to the family. Life got so busy that I didnt even have time to pen down some of my one room challenge projects. Today I am here with a tutorial for DIY Napkin Rings.

DIY Napkin Rings


I love projects which are quick, easy and free.

All you need for this project is a cardboard roll (kitchen towel roll works too), fabric of your choice, xacto knife to cut the roll, hot glue.


Cut the roll into your desired width


Cut the fabric little wider than the width of the rings and glue it with hot glue.

DIY Napkin Rings

Here is a before picture for the reference.


One more showing all the napkin rings

DIY Napkin rings

Options are endless with the DIY Napkin rings, You can add any emblishment to the top or leave it as is.

Thanks for stopping by,

Sharing at: thriftydecorchick


Wednesday, August 24, 2016

Magnetic World Map Wall Art


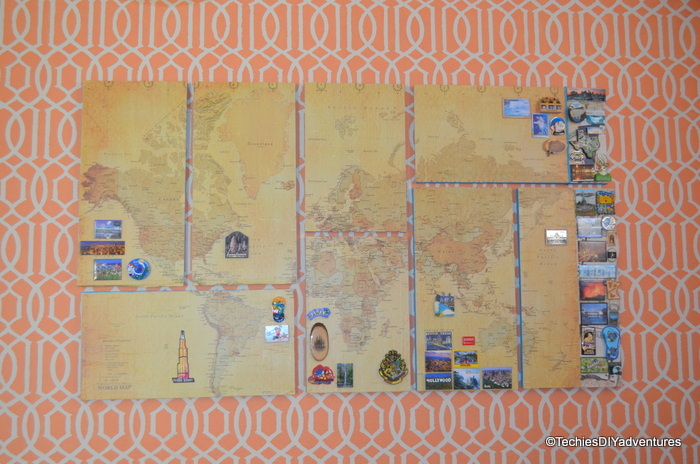
During one room challenge, for our dining room, I made the magnetic world map. Here comes the tutorial for the same.

Me and my husband both love travelling to new destinations. With both kids being little older, exploring new destinations is more exciting. Along with loads of photographs and tons of memories, my husband also brings quite a few fridge magnets. I had made magnetic picture frames few years back but soon the collection increased and frames were running out of space. Whats better than the world map to display our travel souvenirs?


Before we start on how to do it, here is a closeup of the map wall art. It is 60" by 36".


Since the map was 55" by 39",I had to cut off the top and bottom part a little. Also added the craft paper to the right most end of the art.


Materials Needed.

-- Map (from art.com)
-- Galvenized Metal Sheets (Lowes)
-- 1" by 1" square wooden dowels
-- Acrylic Paint
-- Nails
-- Liquid Nail
-- Modge Podge

Procedure
 -- Cut the wooden dowels to the size of the metal sheets
 -- Paint the wooden dowels
 -- Cover the sharp edges of the Metal sheets using tape.


 -- Attach the dowels to the metal sheet using liquid nails and nails (for extra reinforcement)


 -- Cut the map per the metal sheet arrangement
 -- Glue the map onto the metal sheet using modge podge

To hang the map wall art, we used two nails per piece. Each peice just rests on the nails.


With stainless steel refrigerators in most of the house, how do you display your fridge magnet collection? Would love to hear.

Thanks for stopping by to check this out.

Sharing at : thriftydecorchick


Monday, July 25, 2016

Creative and Cheap Ways to Make Your Kids’ Room Look Styled - Guest Post by Kaitlin Krull


Creating a beautiful, picture-perfect bedroom for your children is right up there with having your house featured in Architectural Digest and winning the lottery in terms of achievability —it’s probably not going to happen. While most of us would love to have our kids’ rooms look like something out of a Pinterest board, reality usually makes this dream unachievable. Thankfully, at Modernize we have a few tricks up our sleeve. Here are a few of our top tips for creating a beautifully styled bedroom for your children while staying realistic and without breaking the bank.

Make your own decorations
Decorating a kids’ bedroom on the cheap is actually much easier than it sounds. We all know that kids are professional crafters, so embrace their inner artists and get to making. Cardboard and cloth bunting, pompom garlands, and papier mâché stars are all fun and simple DIY projects that you and your children can complete together. We also love the idea of framing your kids’ artwork and displaying it throughout the room to complete the look: choose pieces with bright, bold colors and fun patterns or pictures to make their art really stand out.


Upcycle old toys and storage

Upcycling is super trendy and inexpensive, so it works perfectly for your kids’ bedroom. Reuse your own childhood and vintage wooden toys for shelf decorations, turn old wicker and fabric baskets and gift boxes into storage for toys and clothing, and repaint an old dresser or sideboard for more storage or a retro changing station. The options are endless when it comes to upcycling, so use your imagination and create something beautiful without spending tons of money at the store.


Add a bit of green
Nothing styles a room quite like fresh-cut flowers and greenery, but we all know that delicate things and kids don’t really mix. Artificial flowers are a convenient and inexpensive solution since they last forever, so choose a bright bouquet to adorn your kids’ bedside table and you won’t have to worry about damage. If you want to cut costs further, use cuttings from your own backyard. Just make sure to replace them often, and remember that kids have a tendency to put everything in their mouths!


Keep it tidy
Regular cleaning and organization keeps the focus on the decor and style of a room instead of clutter, so encourage your children to keep their bedroom as neat and tidy as possible. Underbed storage boxes, bookshelves, baskets, and a well-organized closet will give your kids plenty of room to keep their most prized possessions without feeling overcrowded. This relatively simple step costs nothing and could actually end up making you money if you periodically look for unused items to resell or donate to charity. We also recommend rotating toys and clothing monthly and keeping unused items in storage until they are needed to maximize space and minimize mess.


Thanks,

Tuesday, June 28, 2016

Tshirt/Tops folder using cereal box

Hi All,

Howz summer vacation coming along? Ours is kind of very busy between camp drop offs/pick ups, cooking over time. :)

My little one turned 9 last month and has been after me to assign her more chores. So she has been managing laundrying her clothes which includes folding too. Pants/shorts were easier but tops/tshirts made her whine. How much ever she tried, she would mess up while folding. I had seen this idea on Facebook few months back, so I decided to give it a try.

All that you need for this is either a shoe box or cereal box, scissor and tape.

Procedure to make the folder.

Open the cereal box carefully


Cut and take out the wider the peice and remove all tabs around


Depending on how long you want the tshirt fold, measure and cut the peice vertically. Do the same on the other wider peice too.


Tape this peice to the center peice


 Using the remaining peices of the box, tape the peices on to either side


Your TShirt folder is ready :)

Procedure to fold the tops.

TShirt Folder using Empty Cereal box

TShirt Folder using Empty Cereal Box

She is soo happy with the folding tool that she asked if I could make one for her brother :)


Thanks for stopping by and have a wonderful Summer ahead!!


Monday, June 13, 2016

Dining Chair Makeover with fabric

Hi All,

How are u? I am back after a long hiatus with the tutorial for our dining chairs makeover with fabric.

lets see how the chairs looked before and how they look now :)


before the tutorial, here is a before and after view when you walk into the dining room.


The chairs are very comfortable but the boring back always drove me crazy. When I told hubby dear that I am going to do some thing for the back, he didn't want something permanent and I didnt want to apply any appliques. While I was scoring internet for ideas, I came across this post from dimples and tangles and decided to use fabric.

All that you need for this project is fusible backing material, fabric, glue dots, trim and some hot glue.

- Trace the template using the chair. Cut the fusible backing material and fabric using the template


- Fuse the backing material to the fabric by ironing.

- Attach the fabric to the chair using the glue dots


-- Attach trim using hot glue


Chairs look beautiful with the back all decked up.

Did you do any makeovers using fabric? Would love to hear.

Have a wonderful week ahead and thank you for stopping by

sharing at : betweennapsontheporch thriftydecorchick


Code line 7 9 is for loading jQuery library. Remove this line if you’ve already loaded it somewhere else in your blog. Hint: If your blog has an image slider, carousel or something with fading effect running, chances are it is powered by jQuery. If this widget doesn’t work, the first thing you want to do is comment out or remove this line. To use your own button, replace the URL in line 3 with the direct link URL to the image. Make sure to keep the quotes. To reposition the button, replace