
Sorry for disappearing from blog land!! After coming back from vacation, got completely busy with paper mache elephant project (will post the details soon).
We both love traveling and exploring new places. Hubby loves to collect the fridge magnets as souvenirs from every place we visit. It was fine while we were in rental apartment. Once we moved to this home, we couldn't put these on the stainless steel refrigerator. Couple of ceramic ones broke when slipped from the fridge, so I packed them nicely in a box and put them away. He was sad that his collection was biting the dust in the box. I surprised him with this quick and easy project.

I did this project long time back but sharing it on the blog today :)
All that you need for this project is Galvanized Metal Sheet (I got 12" by 18" sheet from Lowes), Fabric, Picture frame and duct tape. One good idea is to carry the magnet with you while shopping for the galvanized metal sheet. I picked up the frames (without glass and back cover) from Michael's with 40% off coupon.

Please be careful while handling the metal sheet, edges are pretty sharp. I covered the edges with the duct tape to save my fingers.
Wrap the fabric on the metal sheet, just like gift wraping. I secured the fabric ends to the metal sheet using duct tape.

This is how it looked from the front. I selected a neutral color fabric as the magnets are colorful.

I was planning to hang these without the frame (you can see the two holes I drilled for looping the ribbon on the right side). After placing the magnets, realized it was heavy, so, used the frame. Since I was using no back cover and no glass frame, after placing the metal sheet there was a gap at the back. Foam-core board (lying around after some school project) was cut to size and used to fill in the gap. Yes, you guessed it right ;) , I secured with duct tape.

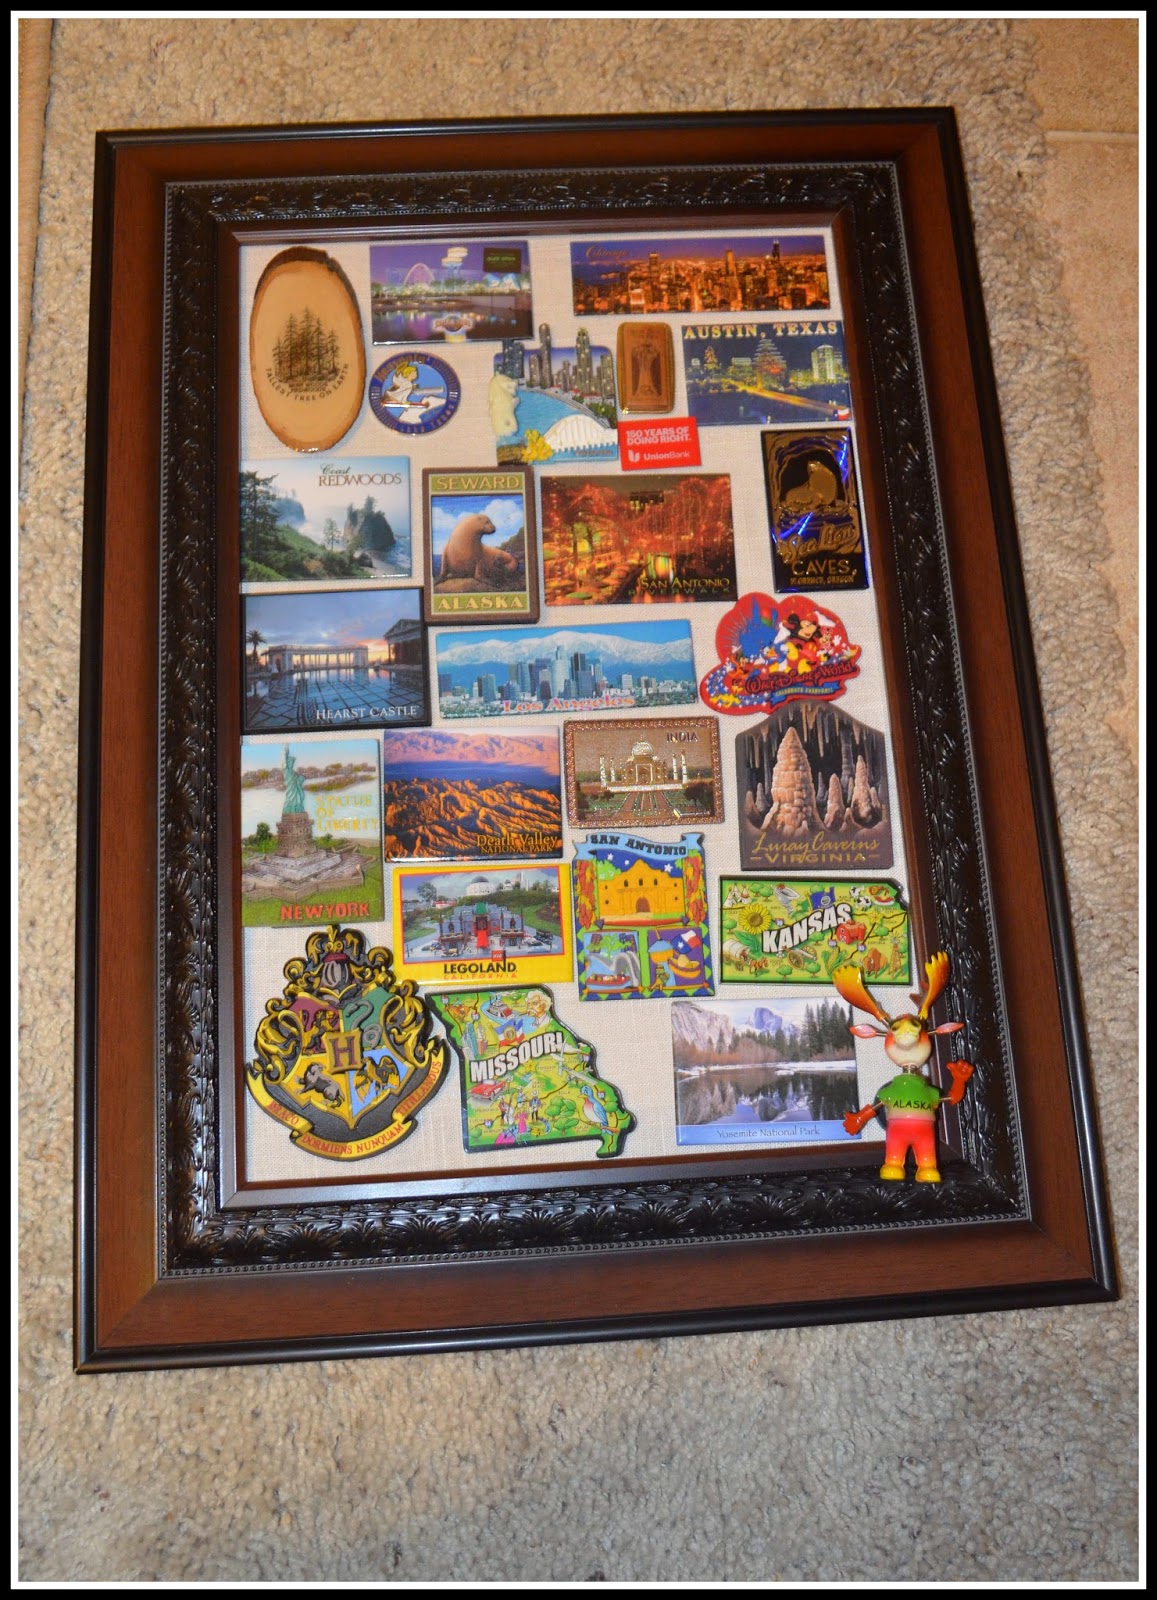
Voila!!! Magnetic Picture frame is ready.

Now time to adorn the frame with magnets :)
Since we had many magnets, I ended up making two of these. Looking at the way collection is growing, I might have to make one more soon.

I love the projects which are quick and deliver satisfactory results. This is one of those projects which you can finish in less than 30 mins, excluding the shopping part :)
What do u collect as keepsakes from your travel??
Sharing at : betweennapsontheporch skiptomylou homecomingmn boogieboardcottage creativelylivingblog modvintagelife housebyhoff titicrafty confessionsofaplateaddict twelveoeightblog huckleberrylove thehappyhousie thethriftyhome polkadotsonparade thededicatedhouse remodelaholic
Thank you for stopping by

We both love traveling and exploring new places. Hubby loves to collect the fridge magnets as souvenirs from every place we visit. It was fine while we were in rental apartment. Once we moved to this home, we couldn't put these on the stainless steel refrigerator. Couple of ceramic ones broke when slipped from the fridge, so I packed them nicely in a box and put them away. He was sad that his collection was biting the dust in the box. I surprised him with this quick and easy project.

I did this project long time back but sharing it on the blog today :)
All that you need for this project is Galvanized Metal Sheet (I got 12" by 18" sheet from Lowes), Fabric, Picture frame and duct tape. One good idea is to carry the magnet with you while shopping for the galvanized metal sheet. I picked up the frames (without glass and back cover) from Michael's with 40% off coupon.
Please be careful while handling the metal sheet, edges are pretty sharp. I covered the edges with the duct tape to save my fingers.
Wrap the fabric on the metal sheet, just like gift wraping. I secured the fabric ends to the metal sheet using duct tape.
This is how it looked from the front. I selected a neutral color fabric as the magnets are colorful.
I was planning to hang these without the frame (you can see the two holes I drilled for looping the ribbon on the right side). After placing the magnets, realized it was heavy, so, used the frame. Since I was using no back cover and no glass frame, after placing the metal sheet there was a gap at the back. Foam-core board (lying around after some school project) was cut to size and used to fill in the gap. Yes, you guessed it right ;) , I secured with duct tape.
Voila!!! Magnetic Picture frame is ready.
Now time to adorn the frame with magnets :)
Since we had many magnets, I ended up making two of these. Looking at the way collection is growing, I might have to make one more soon.
I love the projects which are quick and deliver satisfactory results. This is one of those projects which you can finish in less than 30 mins, excluding the shopping part :)
What do u collect as keepsakes from your travel??
Sharing at : betweennapsontheporch skiptomylou homecomingmn boogieboardcottage creativelylivingblog modvintagelife housebyhoff titicrafty confessionsofaplateaddict twelveoeightblog huckleberrylove thehappyhousie thethriftyhome polkadotsonparade thededicatedhouse remodelaholic
Thank you for stopping by
Bharati, Welcome back...:-). Missed you here. This is a neat project. Looks so organized. We too had these magnets in a box and finally used a magnetic board to display. But mine is no where as neat as yours.
ReplyDeleteThank u Reshma! same here, feel much better to get back on blogland!! would love to see how yours turned out.
DeleteHi Bharati...Lovely project! I totally needed this - have fifteen years of magnets cluttering up my fridge! First time visiting your blog - amazed to see how totally creative and inventive you are! :)
ReplyDeleteCute idea to display your favorite magnets! Thanks for sharing at our Get Your DIY party! October's theme is Falling for Fall. I hope you'll come back on the 5th and share with us again! XO
ReplyDeleteelazığ
ReplyDeletebilecik
kilis
sakarya
yozgat
2RT6
elazığ
ReplyDeleteerzincan
bayburt
tunceli
sakarya
DAAF
görüntülüshow
ReplyDeleteücretli show
4EUWİ
https://titandijital.com.tr/
ReplyDeleteedirne parça eşya taşıma
tunceli parça eşya taşıma
ordu parça eşya taşıma
aydın parça eşya taşıma
2F4
8C989
ReplyDeleteErzurum Evden Eve Nakliyat
Diyarbakır Lojistik
Aksaray Lojistik
Artvin Evden Eve Nakliyat
Şırnak Evden Eve Nakliyat
9E8F3
ReplyDeleteDiyarbakır Lojistik
Muş Evden Eve Nakliyat
Bayburt Evden Eve Nakliyat
Batman Lojistik
Nevşehir Parça Eşya Taşıma
FFFF0
ReplyDeleteZonguldak Parça Eşya Taşıma
Çorum Lojistik
Yozgat Parça Eşya Taşıma
Yalova Parça Eşya Taşıma
Hatay Evden Eve Nakliyat
378F0
ReplyDeleteBitlis Evden Eve Nakliyat
Kilis Parça Eşya Taşıma
Tekirdağ Parça Eşya Taşıma
Kırklareli Evden Eve Nakliyat
Burdur Evden Eve Nakliyat
Bolu Şehir İçi Nakliyat
Sincan Parke Ustası
Aydın Şehir İçi Nakliyat
Afyon Şehirler Arası Nakliyat
5E287
ReplyDeleteKarabük Şehir İçi Nakliyat
Van Şehir İçi Nakliyat
Antalya Rent A Car
Antalya Parça Eşya Taşıma
Edirne Şehir İçi Nakliyat
Bilecik Parça Eşya Taşıma
Binance Referans Kodu
Kars Parça Eşya Taşıma
Urfa Lojistik
2F105
ReplyDeleteZonguldak Evden Eve Nakliyat
Denizli Evden Eve Nakliyat
Sakarya Şehir İçi Nakliyat
Erzincan Şehir İçi Nakliyat
Sivas Evden Eve Nakliyat
Düzce Şehir İçi Nakliyat
Mardin Şehirler Arası Nakliyat
Çerkezköy Petek Temizleme
Eskişehir Şehir İçi Nakliyat
37DD3
ReplyDeleteKonya Lojistik
Yozgat Şehirler Arası Nakliyat
Kilis Şehirler Arası Nakliyat
Çerkezköy Bulaşık Makinesi Tamircisi
İstanbul Parça Eşya Taşıma
Satoshi Coin Hangi Borsada
Yobit Güvenilir mi
Maraş Şehirler Arası Nakliyat
Jns Coin Hangi Borsada
E068C
ReplyDeletebinance %20 indirim
805E3
ReplyDeletebinance %20 referans kodu
45E6C
ReplyDeleteaksaray görüntülü sohbet kızlarla
mersin rastgele görüntülü sohbet ücretsiz
siirt bedava sohbet chat odaları
konya sesli sohbet sesli chat
gümüşhane ücretsiz görüntülü sohbet uygulamaları
mobil sohbet siteleri
bitlis sohbet odaları
çorum canli goruntulu sohbet siteleri
bartın rastgele sohbet siteleri
A6D78
ReplyDeleteBinance Kaldıraçlı İşlem Nasıl Yapılır
Kwai Takipçi Hilesi
Sohbet
Bitcoin Hesap Açma
Binance Hesap Açma
Mexc Borsası Güvenilir mi
Onlyfans Takipçi Hilesi
Likee App Beğeni Satın Al
Chat Gpt Coin Hangi Borsada
63C64
ReplyDeleteParasız Görüntülü Sohbet
Dlive Takipçi Satın Al
Binance Neden Tercih Edilir
Referans Kimliği Nedir
Expanse Coin Hangi Borsada
Telegram Abone Hilesi
Bonk Coin Hangi Borsada
Bitcoin Nedir
Bitcoin Oynama
27BAD
ReplyDeleteGörüntülü Sohbet Parasız
Lunc Coin Hangi Borsada
Kwai Takipçi Satın Al
Telegram Görüntüleme Satın Al
Cate Coin Hangi Borsada
Coin Nasıl Çıkarılır
Paribu Borsası Güvenilir mi
Bonk Coin Hangi Borsada
Referans Kimliği Nedir
564F1E6D02
ReplyDeletetakipçi al instagram
07A8725B67
ReplyDeleteinstagram yabancı gerçek takipçi
instagram beğeni satın al
aktif takipçi
yabancı takipçi
twitter takipçi