
What do u do with two weeks shutdown at work and two sick kids?? Pick up wood, hammer and nails, decorate the entryway wall with board and batten molding :)
This was the project we tackled during 2011 Christmas holidays. I normally have two weeks shutdown for Christmas at work. We couldn't go anywhere as both the kids were just recovering from bronchitis.
I love all forms of molding on the wall and have tried few different types of the wall treatments at home (will post the details soon). Our entryway has high ceiling. To break up bare walls, we decided to use board and batten wall treatment.We skipped the board part as the wall is pretty smooth and used just the battens.
Here is the picture of before and after.

After my measurements and the design plan, my husband double checked the measurements. Measure many times to ensure that you have correct measurement before the wood is cut. We got the wood cut to specifications at the Home Depot. Did u know home depot cuts the wood per your requirement for a minimal charge? well, you know it now.:)
We decided not to remove the baseboard and angle the lower end of the batten to avoid the batten sticking out where it meets the baseboard. Though tried hard to avoid cutting the battens to accommodate switches/plug points (by adjusting the number of panels), still we ended up cutting at couple of places
This is how it looked during the process.
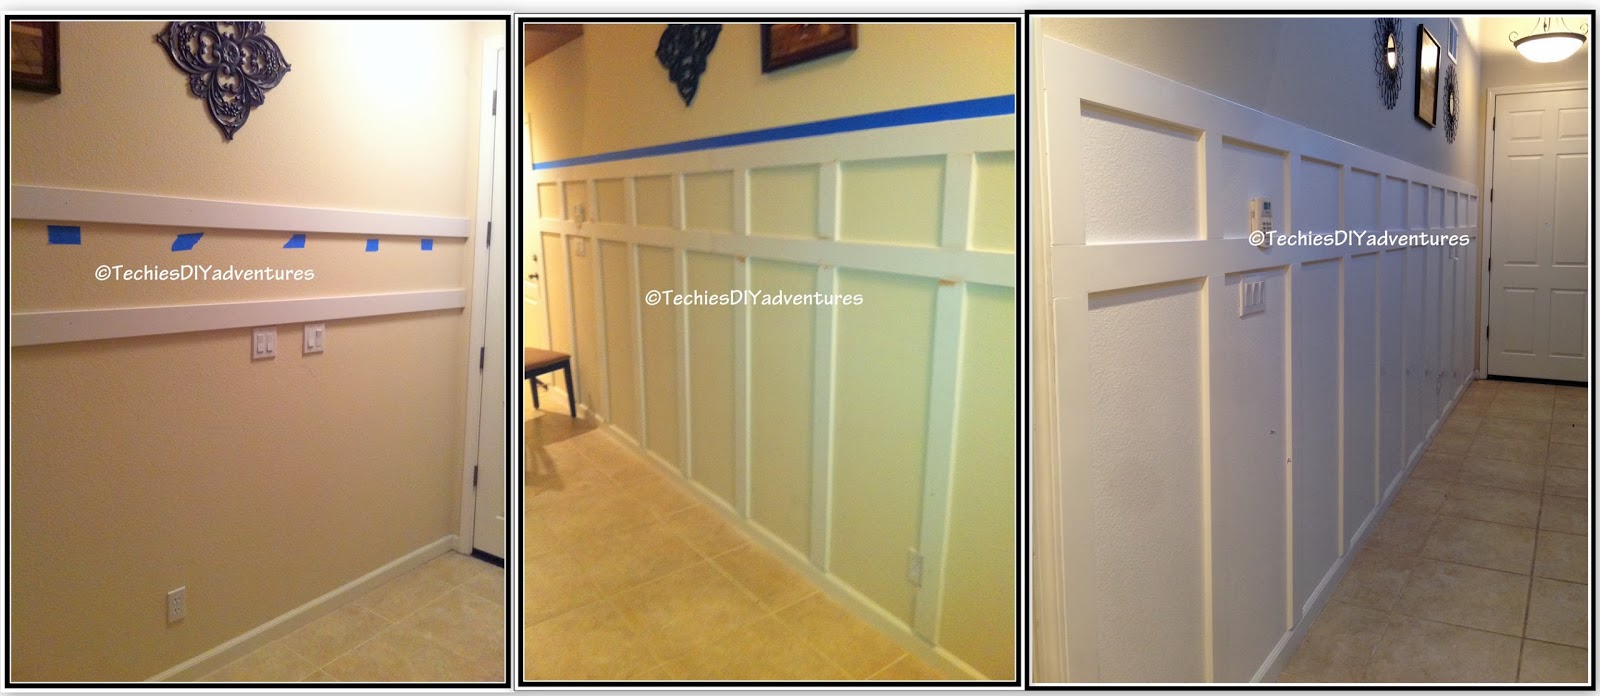
Here is how it looked after.


One more After.

From Formal Dining

Here is how we did it.
Here is how we did it.
- Glue the panels to the wall using the construction adhesive.
- We don’t have pneumatic nailer and not even planning to buy one. So hammer the brad nails and build muscle during the process (alas, only on right arm though).
- Once all the panels were nailed, went over again with the nailset on the nails to ensure that the nails are fully sunken in the panel.
- Spackle the nail holes. After the spackle is dried, sand it properly.
- Caulk all the gaps using a caulk gun.
- Painted everything with the coffee white paint
Linking at http://thetablescaper.blogspot.com/2014/01/seasonal-sundays-187outdoor-winter-decor.html
http://betweennapsontheporch.net/fireplace-and-mantel-makeover
http://www.skiptomylou.org/2014/01/27/made-by-you-monday-188/ somedaycrafts katherinescorner
http://diyhshp.blogspot.com/2014/01/more-merrier-monday_26.html
http://thededicatedhouse.blogspot.com/2014/01/make-it-pretty-monday-week-86.html
http://boogieboardcottage.blogspot.com/2014/01/welcome-to-160th-masterpiece-monday.html
http://threemangoseeds.blogspot.com/2014/01/its-part-time-12614.html
http://www.homestoriesatoz.com/tutorials/tutorials-tips-link-party-143.html cherishedbliss
http://www.tipjunkie.com/post/handmade-projects-add-yours-1-27/
http://www.savvysouthernstyle.net/2014/01/wow-us-wednesdays-154.html
http://www.frommyfrontporchtoyours.com/2014/01/treasure-hunt-thursday-141-highlights.html frenchcountrycottage ivyandelephants
http://www.serenitynowblog.com/2014/01/weekend-bloggy-reading-link-up_31.html akadesign
cupcakesandcrinoline.com
Bharati, Wow...makes a lot of difference to the wall. Great job again!
ReplyDeleteThank u Reshma
DeleteWhat a difference, this looks so pretty. Love it. Thanks tons for linking to Inspire Me. Hugs, marty
ReplyDeleteThank u Marty. Thank you for hosting
DeleteThis looks great! I always eye this type of wall treatment when I go to model homes and have always wanted to try it. Thanks for the how to and for sharing at The Makers. Hope to see you back on Tuesday!
ReplyDeleteCorey @ TinySidekick.com
Thank u Corey. Thanks for hosting
DeleteHi Bharati, I love your board and batten post and I featured it this week at Boogieboard Cottage! Have a blessed day, Mary
ReplyDeleteThank u so much for the feature Mary. Thanks for hosting
DeleteWhat a beautiful transformation. I came across your blog while on another blog and it sure did catch my eye. You did a great job with the board and batten treatment on your entry way.
ReplyDeleteI would love to have you to link up at my weekly Clever Chicks Blog Hop
:http://www.the-chicken-chick.com/2014/02/clever-chicks-blog-hop-72-with-two.html
I hope you can make it!
Cheers,
Kathy Shea Mormino
The Chicken Chick
http://www.the-chicken-chick.com/
Thank u Kathy, I am glad you stopped by. I could make it to your party. Thank u so much for hosting
DeleteReally beautiful!!! Pinning and sharing:)
ReplyDeleteThank you Michele
DeleteWhat a wonderful transformation! Thanx for sharing at THT.
ReplyDeleteThanks for hosting Pamela
DeleteThanks for hosting Kathy
ReplyDeleteThis turned out so awesome! I've been wanting to add some board and batten treatments to our home for a while. Great inspiration! Thanks for sharing at our Link it or Lump it party!
ReplyDeleteThank you Amy. Would love to see how yours turns out :) Thank you for hosting
DeleteYou are a busy girl with all these projects! I love the board and batten-adds such a custom touch to your walls! Thanks for sharing at Fridays Unfolded!
ReplyDeleteAlison
Nancherrow
Hi Alison, few of these are old projects. I started blogging pretty recently however have been working on home projects for good 4-5 years. So I get to share lots of project :)
DeleteThank you for hosting
You did an amazing job! It looks wonderful!
ReplyDeleteThank you for stopping by Kathy.
DeleteI love how this turned out--it's beautiful! I'd love to do a project like this in my home. Thanks for the inspiration!
ReplyDeleteThank you Carrie.
DeleteI love the wall. It really adds to the appeal and makes it look so finished!! We have done this with a few walls and I think it is so classy. Thanks for sharing!
ReplyDeleteThank you Elizabeth
DeleteI love your board and batten treatment. I've been dying to try this myself...and can't seem to find the time. You're gorgeous project will be a feature on Twirl and Take a Bow tomorrow...hope you'll join us.
ReplyDeleteWove!! That's a nice way to start the day, Thank you Tammy. Thanks for hosting, see you at the party today
DeleteWove!! That's a nice way to start the day, Thank you Tammy. Thanks for hosting, see you at the party today
ReplyDeleteLove this one Bharati. Need to try it as well.
ReplyDeleteThank u Vidya.
DeleteThanks for linking this up to the Welcome Home Wednesdays link party! I'm obsessed! I love how just a few boards totally transforms your space!Thanks for sharing...we hope to see you again next week!
ReplyDeleteThank u. True, Wall treatments surely add character to the plain walls.
DeleteWhat a statement this wall makes! It definitely added extra elegance to your space. I'm visiting from the Welcome Home Link party. Thank you for stopping by to party with us. I hope to see more next Wednesday!
ReplyDeleteThank u. Sure thing :) Its a pleasure to party with u.
DeleteI absolutely loved reading about your experience with board and batten... I am currently trying to talk my hubby into putting one up in our office! I can just picture it... absolutely breathtaking! I want to skip the board and just use the batten... just like you... so I loved seeing your example! Thanks for stopping by the Welcome Home Wednesday Link-Party today... I loved the opportunity to read your post! We'd love to see you next week!
ReplyDeleteThank u for stopping by Betsy. You are too sweet and generous with your comment :) Would love to see how your office turns out. Have a wonderful week ahead!!
DeleteIt looks amazing!
ReplyDeleteI would love for you to stop by and share this at our Something to Talk About link party that starts every Monday morning!
Karen
Thank u Karen. Sure thing :) will see you next week at your party.
DeleteJust popping back in to say that your post was picked as one of the features for the this weeks Welcome Home Wednesday Link Party! Whoo Hoo! The party goes live at 7am CST tomorrow morning... so pop on over to see your project and link up a new one!
ReplyDeleteThank u Betsy. Happy to be featured with all other awesome features. Thank u so much for the party and inspiration. Have a blessed and creative rest of the week
DeleteThis comment has been removed by the author.
ReplyDeleteThis article is unique and interesting. thanks for your share. I have been meaning to write something like this on my website and you have given me an idea.
ReplyDeleteNuCladd’s diy wall panels make home improvements easy—durable, stylish, and simple to install.
ReplyDelete